
Face Mask Sewing

Let's get sewing! I'm so excited to be able to share all of the fabrics and elastics I've collected over the years.
Sewing instructions follow below, and are also downloadable here as a .pdf file.
Although these are not medical grade, many healthcare organizations across the country have requested donations of homemade masks for patients, or to be used over n95 masks to help keep them clean when supplies are limited.
Here is a list of organizations that have requested masks in the U.S. www.weneedmasks.org.
If you would like me to choose an organization that needs masks and provide you with a prepaid mailing label for the masks you have sewn, please send me an email and I'll get you a label, elizabeth@elizabethcotton.com.
Thank you in advance for asking for materials and sewing. Staying busy has helped me feel better and I hope sewing makes you feel better too!
I hope you and your loved ones stay safe and healthy.
xo Elizabeth
Face Mask Sewing Instructions (download a pdf)
We will supply:
tightly woven printed cotton fabric (exterior)
nonwoven fusible
solid cotton fabric (interior)
soft elastic
You will need:
Sewing machine (highly recommended for 4 pcs and required for 24 pcs)
Scissors
Pencil
Iron
Thread
Safety pin or Paperclip
Sewing Instructions:
We highly recommend watching this video of this mask being sewn before you begin.
- Wash the cotton fabric in hot water and tumble dry on high heat, ironing both fabrics afterward (do not wash the fusible or elastic at this point).
- It is most efficient to iron the fusible onto the exterior printed fabric before cutting.
- The dots on the fusible are the glue and they should face the fabric. The smooth side of the fusible is the side that should face the iron. The fusible is ironed onto the wrong side (dull side) of the printed fabric.
- Cut two pieces of pattern piece A from the printed fabric that now has the fusible attached. The up and down arrow on the pattern piece should be laid parallel to the edge of your fabric. Trace around the pattern piece with a soft pencil while holding the pattern piece in place. Cut the first piece with the pattern facing up, and then flip the pattern over for the second piece.
- Transfer the two dots on the pattern onto the fusible (wrong) side of the fabric. A line between the two dots will be your guide when folding over the tunnel that holds the elastic.
- Cut two pieces of pattern piece B from the solid color fabric. The up and down arrow on the pattern piece should be laid parallel to the edge of your fabric. Trace around the pattern piece with a soft pencil while holding the pattern piece in place. Cut the first piece with the pattern facing up, and then flip the pattern over for the second piece.
- If you are making more than 4 masks I recommend recreating the paper pattern using something thicker like a manila file folder, as it will be much easier to slide the pencil against a durable pattern while tracing.

- take both A printed cotton pieces and place both right sides together. Sew the center seam.

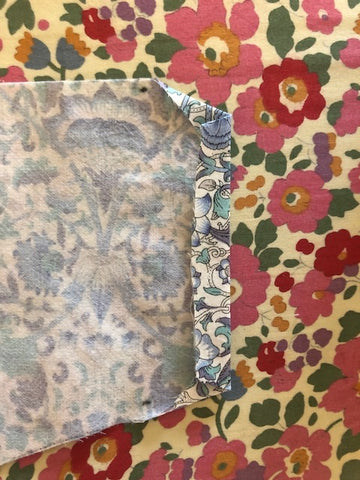
- Fold over the corners of A pieces three times as pictured and press down with the iron. Edge stitch the three folds.

- Using the dots as a guide, fold over and stitch the newly sewn curved edges to create a tunnel for the elastic
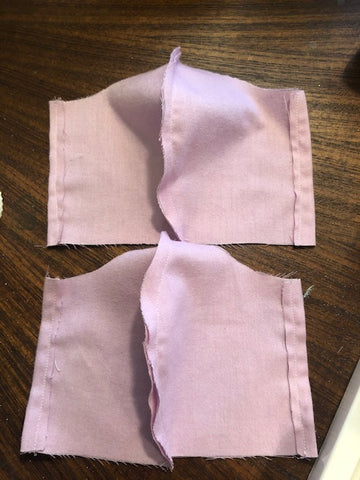
- Take both B pieces and place both right sides together. Sew the center seam.
- With the seam facing up, fold over the edges of size B pieces ¼” and stitch.
- With right sides facing one another, stitch the A pieces to the B pieces along the top and bottom edge. The B pieces should be on top when you are sewing.

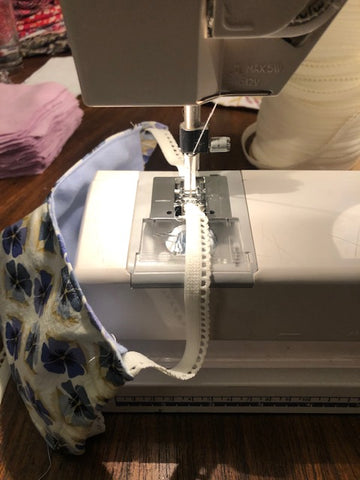
- Flip the piece inside out, press the edges down with your fingers, then iron the edges. Edge stitch along the top and bottom edge for stability and to help the mask keep its shape after laundering.

- Cut 24” (approximately) of elastic and use a safety pin (preferred) or paperclip to push the elastic through the two tunnels.

- Overlap the elastic about ½” and stitch together. Reinforce this stitch as well as you can.
- Gently adjust the elastic so that the overlapped pieces are inside the tunnel.


